The Company Admin page is a centralized location for managing company-wide settings. It allows admins to control structure, permissions, integrations, and standards. When making changes here, they will impact all projects across the company.
To access the Company Admin page, click the Admin icon from the Global Navigation Menu. Within the Company Admin page, there is a menu bar at the top with the following tabs:
Company
The Company tab allows admins to update company name, logo, and address information. Additionally, you are able to define and manage the custom metadata fields that appear across projects in the company. This ensures that all projects are tagged and categorized consistently, making reporting and filtering more reliable across the portfolio.
- Create and manage custom metadata fields that appear on project setup forms
- Define dropdown options, text fields, and other input types for structured data entry
- Ensure all projects capture the same key information at creation
To add a new metadata field: Click Metadata from the company dropdown, click +Metadata, define the field name and type, determine if it is required, and click Save. The field will then appear on all new and existing project profiles.
Data Integrity
The Data Integrity tab is where admins manage core company-wide settings including configurations that shape how SmartPM behaves across all projects. Admins can also create and update quality profiles for how you want to evaluate schedule's quality. Finally, you can create and manage checklists for your schedules.
Within the Configurations tab in Data Integrity, there are several areas users can manipulate:
-
Schedule Data- How SmartPM reads and normalizes what's sin the schedule
-
Basis of Analysis- What results get measured againts
-
Presentation & Tracking- Changes what's shown without changing the underlying math
-
Workflow & Notifications- Governance, permissions, audits, and alerts
-
Intelligence- SmartPM's machine learning and AI features
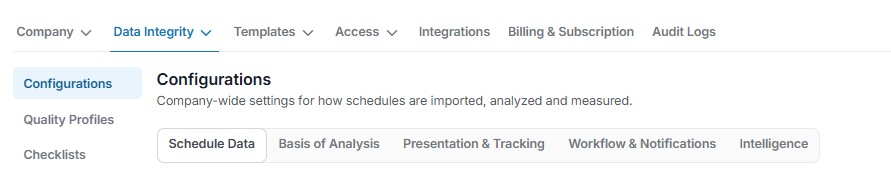
This is the foundation of your SmartPM environment. Changes here affect standards and defaults at the highest level.
- Set company-wide defaults for schedule settings, working calendars, and project preferences
- Define delay thresholds and performance benchmarks used in analytics
- Configure how SmartPM calculates and displays project health across the portfolio
The Quality Profiles tab within Data Integrity allows admins to define the standards that SmartPM uses to evaluate schedule quality across projects. These profiles ensure that all project schedules are measured against the same criteria company-wide. Click here to learn more about each Schedule Quality Profile Templates.
- Create and manage profiles that define acceptable schedule quality thresholds
- Set rules around logic, constraints, durations, and other schedule health indicators
- Assign quality profiles to projects to enforce consistent review standards
To create a new Quality Profile, click + Quality Profile. Make any necessary adjustments to the new profile, and click Save.
Within the Quality Profile tab, you can set a selected profile as the default, clone quality profiles, or print out the quality profile as a report.
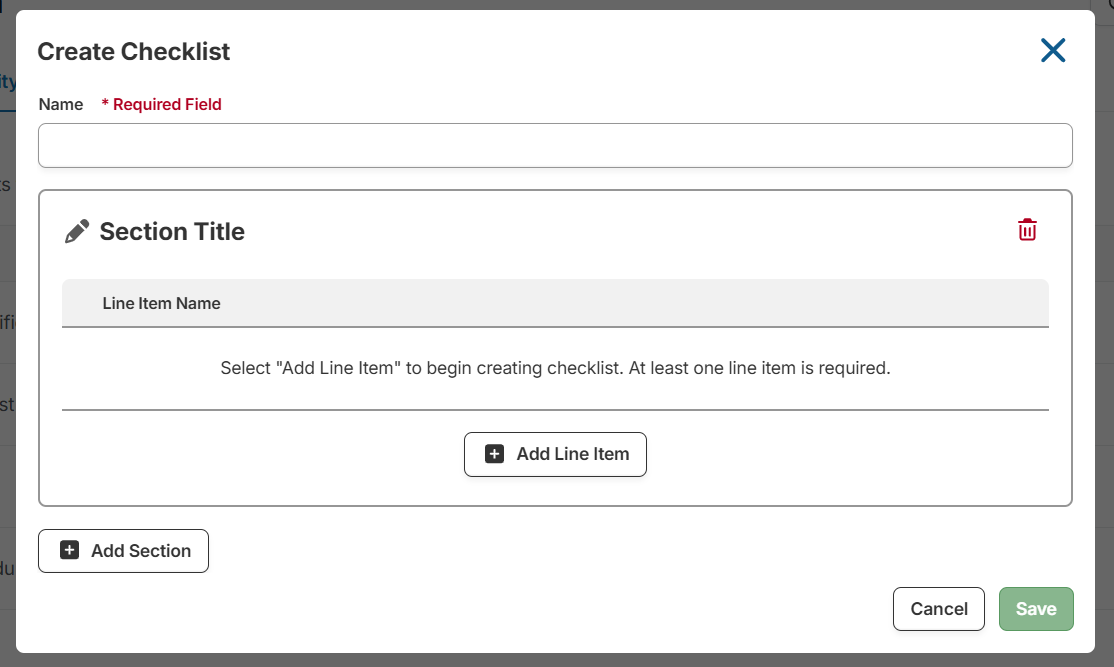
The Checklists tab allows you to create and manage checklists for your schedules. To create a new checklist, click + Checklist. Once a name is entered, you are able to add line items and sections as needed. When complete, click save.
Templates
Templates allows you to create, edit, and assign Project Workspaces and Company Dashboards.
- Pre-configured rubrics tailored to different project types
- Include recommended logic checks, threshold settings, and focus areas
- Designed based on best practices and real-world use by SmartPM customers
- Fully customizable. Use as is, adapt, or draw inspiration for your own rubrics
Available Templates and Descriptions:
|
Project Type |
Key Characteristics |
Focus Areas in Template |
|
Multifamily & Highrise Construction |
|
|
|
Mission Critical Facilities |
|
|
|
Department of Transportation Projects |
|
|
|
Federal Government/USACE Projects |
|
|
|
Industrial/Manufacturing Facilities |
|
|
Access
The Users dropdown within the Access tab provides a complete view of everyone who has access to SmartPM under your company. The Groups tab within the access dropdown allows you to create and manage groups for your organization with project access and permissions.
- View all active and inactive users in the company
- Invite new users and assign them a company-level role
- Deactivate users who no longer need access
- Edit individual user roles and permissions
- See user login counts and details
To invite a new user: Click + User, enter their email address, name, assign a role, determine if they are an SSO User, decide whether to restrict reporting access, and click Save. The user will receive an email to set up their account.
You can also export the entire user list by clicking Export User List.
User Roles
Company Admin: Full privileges to create projects, upload schedules, access admin settings, etc.
Company Read Only: Can view all projects but not edit schedules or manage projects.
Company User: Can only access projects they are assigned to. Permissions depend on project-level roles.
Company User + Add Project: Can access projects they are assigned to plus create new projects.
The Groups tab allows admins to organize users into groups, which can then be assigned to projects or given specific permissions collectively. This simplifies access management, especially for larger teams.
- Create groups based on teams, departments, or project roles
- Add or remove users from groups as team compositions change
- Assign groups to projects to streamline permission management at scale
To create a group: Click + Group, give the group a name, add the relevant users, and click Save. The group can then be assigned to projects from the project level.
Once a group is created, you can manage the project available to the group, edit the name or members of the group, or delete the group.
To create a group: Click + Group, give the group a name, add the relevant users, and click Save. The group can then be assigned to projects from the project level.
Once a group is created, you can manage the project available to the group, edit the name or members of the group, or delete the group.
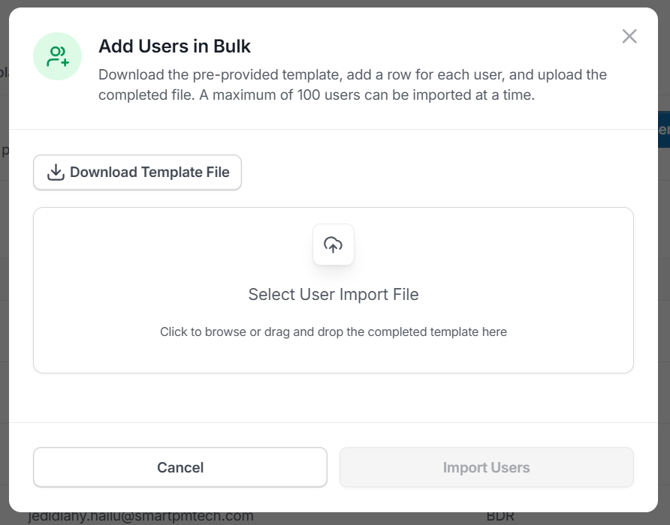
To add users in bulk: Click Add Users in Bulk, click Download the Template File, fill out the user information to be added, and elect user import file to add the completed template. Click Import Users when file is uploaded.
Integrations
The Integrations tab is where company admins connect SmartPM to third-party platforms and tools. Setting up integrations at the company level makes them available across all projects, eliminating the need for individual project setup.
- Connect to document management systems such as Egnyte
- Manage authentication and authorization for connected platforms
- Enable or disable integrations for your company environment
To connect an integration: Locate the desired integration tile, click Connect, follow the on-screen authorization steps, and confirm the tile shows a Connected status.
Billing & Subscriptions
View and manage project plan allocations across your organization. Within this tab you can view where your projects are allocated.

Audit Logs
- View a complete record of user actions, including who is creating, updating, or deleting projects, models, and scenarios
- Track changes to configurations, quality profiles, and other platform settings
- Gain greater oversight and accountability across your organization